Monday, August 23, 2010

Product Review: Dentaburst

Dudes, have I ever been on the run! I spent a large portion of the summer either travelling, or frantically trying to finish up work before travelling some more. All that dashing about has made me realize just how much I adore these:

DentaBursts! They are these hilarious little finger-gloves that you slip onto your index finger, with which you can then mime brushing your teeth. The nubbly fabric helps remove plaque, and the whole thing's coated in a light minty powder to help freshen up that kisser. Post-lunch meetings, redeye flights, impromptu sleepovers... whatever your occasion, DentaBursts have got you (or at least your mouth) covered.

These handy things come pre-packaged each in their own credit-card sized pouch, and slip discreetly into the smallest of pockets or clutches. Sure, it's no replacement for actually brushing your teeth, but believe me, when you are the only one to step off that overnight bus-ride with clean-feeling teeth, you won't mind one bit.

You can find DentaBursts at Target or RiteAid (will update when I find a Candian source), and they come in both Mint and Cinnamon. Keep 'em in your desk, your purse, your car... you never know when you might need one!

Labels: ,

Friday, May 21, 2010

Moving Tips (aka: In which I sound like I work for Glad)

I hate moving. I mean, I really, really HATE moving. As you savvy readers may have sussed, I have a lot of crap. A lot of beauty product crap, to be sure, but my hoarding tendancies don't stop there. Books, cookware, barware, clothes, shoes... I just have a lot of stuff. So you can imagine that packing up all my crap just to schlupp it somewhere else and unpack it again is definitely on my list of least-favourite-things-to-do.

Incredibly, for someone who hates moving, I've moved an average of once a year for the past 5 years. They (the wise folks??) say that there are lessons to be had amidst adversity, so I thought I'd pass on some of the little tricks I've learned during my myriad of moves that have made life just a little bit easier.

1. Plastic wrap is your friend.
Most of us have those little cutlery organizers. A smaller subset of us have trays and mini-cubbies full of makeup. What is the point of taking out the contents of these containers to pack them up in boxes, only to have to unpack them again hours later? THERE IS NO POINT. Instead, just wrap up those suckers in plastic wrap, as though you were shrinkwrapping the damn thing. Then, chuck the whole thing in a cardboard box. When you get to your new place, just cut through the plastic, and... TADA! Your cutlery/makeup/art brushes/extensive button collection is all ready to go into its new home. Cutlery is one of those things you'll need right away after a move, and it's just such a relief to have it all ready to go, instead of sorting through a shoebox of knives and spoons.


2. Garbage bags may seem ghetto, but they are actually ghetto fabulous.
You have a lot of clothes, yes? Much of it on hangers? Along the same lines as the last tip, why take all your jackets and blouses and dresses off their hangers, only to have to re-hang them all at your new place? Instead, gather 6-10 hangers (depending on the bulk) with the clothes on them, and use masking tape to tape all the 'stems' (the straight bit just under the hook) of the hangers together.  Once that's done, just slip a garbage bag over the bundle, poking a hole at the bottom of the bag so that the hanger can go through. Basically you are fashioning yourself a big dry-cleaning bag. Tie up the ends of the bag (at the bottom of the clothes, so that nothing falls out), and you're good to go. The bagged bundles take up much less space than boxes, and once you're at your new place, all you need to do is tear away the bags and tape, and your closet is up and running. Obviously, this isn't the best idea for cross-country moves, but if your stuff will only be spending like an hour in a moving truck, this trick will do just fine.

3. Giant ziploc bags are both comical and efficient.
Have you guys seen these things? You can find them at WalMart or sometimes Canadian Tire. They are amay-to-the-zing. Exactly as advertised, these are huge-ass ziploc bags. But instead of Chex Mix or whatever, you put your neatly-folded up clothes into them. Each bag will hold about a drawer's full of clothes (depending on the size of your drawers, of course). First and foremost, gimungous bags are funny, and if you're going to make your friends help you schlepp your shit across town, you should at least also make them laugh. Secondly, unlike big bulky boxes, clear bags mean you'll see what's in each bag more quickly, without labelling. They also fit a lot better/easier into whatever nooks and crannies you find in your moving truck. And finally, once you've settled into your new place, the huge ziplocs double as laundry bags too. Genius.


4. Regular-sized ziploc bags are less hilarious, but still efficient. Like the Germans.
So, you guys know to store the nuts and bolts and screws from your dismantled furniture in a small ziploc, and to tape that bag to part of the furniture, right? Of course you do. What is it, amature hour here?


5. Mark very very clearly the box that contains the corkscrew / bottle opener.
Trust me, you may well find yourself casually hurling your umpteenth box marked "Kitchen Misc." at the wall after you've spent 30 mins searching for these objects. This also applies to a lesser degree to the shower curtain and toilet paper.


6. Throw money at the problem if you can. 
Having moved both with the help of my wonderful long-suffering friends and by hiring movers, I can tell you that the latter is like 8-bajillion times better (p < .01).  Seriously, I don't know how I can ever go back. But, if you can't, or don't want to drop the cash, be sure to cultivate as many friendships as possible with people who are easily swayed by promises of food and alcohol. (See also: making friends in grad school.)


No matter what, moving sucks. But, with these tips, hopefully your move can go a bit smoother than it might have. At the very least, you should be able to crack into that bottle of wine earlier. (Yes, I realize you haven't unpacked the box with your stemware yet. Why are you looking at me like this is a problem? Wine bottles are just like big beer bottles, after all!)

Labels: , ,

Wednesday, February 03, 2010

Awesome tip: Customize your gel eyeliner!

Hey you gorgeous gals! Know what I think is one of the hottest things to wear on your lids these days? A vibrantly-dark-but-shimmery smokey eye. (I also think hyphens are hot, obvs.) And what easier way to achieve this than with some lusciously pigmented gel eye liners in various yummy shades? Just sweep it on, blend in a bit of shadow, and Bob's yer (expertly made-up) uncle.

But of course, some of us (ahem) don't actually have a real income with which to buy a plethora of gel liners, and even if we did would rather avoid the accusatory gaze of certain significant others for buying yet ANOTHER cosmetic item (hey buddy, me and the shiny pretty things are a package deal, capiche?).

However! Because I'm so smart that I decided to go to graduate school and will never get out(HA!), I stumbled across a trick the other day:


+


... equals TEH AWESOME! Seriously. Just dig out a teeeny tiny clump of your black (or grey, or brown, whatevs) gel liner with your slanted liner brush, and put it on the back of your hand. Then, take another brush and pick up a good amount of a shimmery loose eyeshadow (like a MAC pigment, or loose mineral shadow). Tap the shadow brush so that the powder falls over the liner that's on your hand, then use your slanted brush to blend blend blend. Soon, you will have a smear of custom-created gel liner that you can use to add quick and easy drama to your eyes! So awesome.

The best part is that you can use whatever colour strikes your fancy. I'm thinking that it's probably most effective to use a light iridescent shade, since the dark liner will deepen the colour considerably. But hey, go nuts and experiment. I'm thinking glitter (cosmetic-grade, of course) would be hot too.

And, let's face it, this is the only way I'll ever come close to finishing that jar of liner. Or an eyeshadow, for that matter.

What do you think, bellas? Cool trick? Old news?


Labels: ,

Tuesday, December 23, 2008

Lippie Product Reviews: Sephora Lip Stain, Urban Decay Lip Envy, Prestige LightShine Sheer Gloss Liner

Oh hey, it's almost Christmas! Which means it's almost New Year's, and I know what's on everyone's mind during this festive season: Holiday Makeup that Lasts!

Oh alright, maybe makeup isn't at the absolute top of your priority list. But when you're running around doing that last minute holiday shopping, or up to your elbows in turkey stuffing and cookie batter, it'd be nice not to have to worry that your lipstick is bleeding.

For lipcolour that is sure to last through canapes and cocktails, a lipstain is your best bet. Remembering the good things I'd heard about Urban Decay's old lip stains that came in marker form (now discontinued), I picked up their Lip Envy stain in Envy. Let me just say, that was a mistake! I guess it went on easily enough, though it felt kind of drying. The colour was just way too harsh... a deep vampy red. Normally I don't shy away from reds, but this was just too goth, and not at all festive. It emphasized dry flakes too. To its credit, the colour was incredibly rich and pigmented, but I ended up returning it.

I had much better luck with Sephora's Lush Flush Wine Lip and Cheek stain. A sheerer gel-based version, 1 coat leaves your lips with a light tint of cool pinky red. Apply more to build a deeper colour. It's not a red exactly, it's got a bit too much pink for that. But still, a nice holiday colour, and the formula lets you play with it a bit before it sets. I've never used it on cheeks, but if you like cheek stains and use a light hand, this looks like it'd be a handy multi-tasker. As with all lip stains, if your lips are not in perfect condition (and whose is in this wretched winter weather?), it will go on a bit patchy. I've had good results applying the stain with the sponge tip, then using a q-tip to blend more accurately.

Finally, I must tell you about the neatest drugstore find! Prestige has a new lip liner out called a Sheer Gloss Liner. Unlike a normal liner which deposits solid heavy colour, the Sheer Gloss Liners draw a semi-opaque line that goes on smooth. The formula is hard to describe... it's not a gel exactly... maybe more like a soft wax? This liner was designed such that you can wear this under lipgloss to up the staying power, while still maintaining that sheer, see-through look. It's also got a light, pleasant vanilla scent. Personally, I love just using this on its own! It's a softer look than lipstick, but it stays on so much better and manages to feel smooth and non-drying. I nave it in Hibiscus, which is a cheery, neutral-cool light red, but I definitely need to pick up more shades!

Well that's it for now lovelies, as you can see it is 4am and I'm exhausted from Christmas shopping, cleaning, and packing. I hope you all have a wonderful and safe holiday season, and that Santa's kind to you!

Labels: , ,

Thursday, August 14, 2008

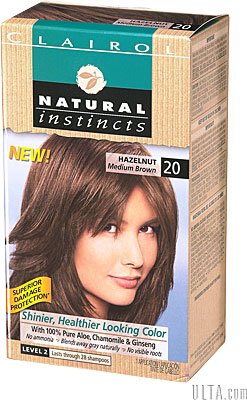
Product.... Review? Clairol Natural Instincts

From the archives: A couple summers ago, I decided to take out my highlights by going over them with a semi-permanent colour. I had... shall we say "interesting" results. Even though this is an old post, it still gets some comments, so I think it's worthy of another mention. I've actually toyed with using Natural Instincts again (in a lighter shade, of course), since it did leave my hair really really shiny, but I've yet to take the plunge. For now...


Ok, fine, so maybe I was overreacting a bit. The hair is dark, but it's not that dark. The freshly dyed hair, still wet from the shower, combined with the late hour and the long black nightgown sort of made me feel like I should wear lots of eyeliner and draw pentagrams everywhere. But today, after a good night's sleep and some berry lipgloss, things don't seem quite so bad.

Let's start at the start, shall we? Because I'm so indie and cool*, I apparently like to do the opposite of what the seasonal hair trends are. In the winter, when everyone's going dark, I get highlights. When the sun comes out and people go lighter, I have manic compulsions to take out all my highlights and go monotone. The many highlights I'd had from months past were getting kinda freaky. Plus, there were hella roots, which is never a good look. So after months of saying that I wanted to cover my streaks, I finally took the plunge.

A very capable stylist once told me that the best way to grow out highlights was to use a semi-permanent rinse in a shade close to your natural (or base) colour and apply it all over your head. Because of its low peroxide levels, the rinse won't lift your natural colour, but it will cover any lighter strands. As it's not a permanent dye, the colour will eventually fade and wash out gradually, but your highlights will still grab on to a tiny bit of the darker hue. After 3 or 4 weeks, repeat the process. By the 3rd time, your highlights should be close enough to your base colour so that roots are not noticeable. This repeated dyeing shouldn't be too harsh for your hair, since you're not bleaching or lifing any colour.

Sounds good in theory, right? So yesterday, off I go to pick up a box of semi-permanent dye. The only one I could find at the drugstore was Clairol's Natural Instincts, which made brand selection pretty darn straight forward.


The Hazelnut shade is described as a medium brown, and I chose it because it was fairly neutral. I didn't want to go with too warm of a shade since I didn't want it to deposit with a red tinge, and I feared that a really cool shade would make things look ashy. And I like Hazelnut coffee and Hazelnut chocolate and Hazelnut ice-cream, so it seemed like the right choice for me.

The process was fairly simple: pour the developer into the dye, then shake the bottle like you're channeling pre-crazy Tom Cruise in Cocktail (I miss you, pre-crazy Tom!). After it's thickened, squeeze the product from the pointed spout onto your hair, starting at the roots and working down.

10 minutes later (or up to 20 min if your hair is resistant), you're supposed to rinse the dye away to discover your great new colour.

So what went wrong? Maybe I should have followed instructions and not left it on for 20 minutes (what? I thought my hair was 'resistant'. It is not.). Or maybe I should have picked a lighter shade. Because somehow, the dye made my BASE colour darker than before. WTF? My base IS black, how could it get any darker?

As it turns out, most of my hair was probably an "off-black" (is that even a term?) to begin with. Between the highlighting and the sun and the 14 years of hard mountain water I'd been subjecting my hair to, my natural colour had faded. And so, now not only were my highlights covered, my overall colour was darkened, leading to my mild-to-medium-rare freak out last night.

In all honesty, it's not that bad. It's more the shock than anything. The highlights are still visible, albeit much darker than before. The ends of my hair seemed to absorb more colour, which is not a surprise since the ends are always drier. Besides, this shade is technically much closer to the one with which I was born, and if Lucy Liu, Sandra Oh, and eleventy bajillion people in China can look good in it, so can I.

Generally speaking, Clairol Natural Instincts did its job. The colour was darker than expected, but it did do a beautiful job of covering highlights -- they are toned down, but still kind of visible, which helps break up the solid colour. And, the best thing is that my hair is now shinier than I have ever seen it. It feels really silky and healthy too. The darker shade (great for hiding split ends!), minus the brassy highlights, plus the kick-ass conditioner they include in the box, make me want to toss my locks around and say things like "daaaahling". So that's really cool. Also, my hair looks longer for some reason. That could be the fumes from the dye talking though.

Obviously, I can't tell yet how this will wash out, but I think I'll use a clarifying shampoo tonight to see if I can lighten the colour just a tad. I think it's safe to go outside without scaring the children; the dogs didn't seem to think I was Satan Incarnate when they saw me this morning.

So, if you're looking to grow out your highlights gracefully, using a semi-permanent colour like Natural Instincts is definitely an option. I would pick a shade or 2 lighter than you think you'd like to end up. This way, the change is more gradual and you won't be tempted into melodramatic 2AM hystrics. If it doesn't end up as dark as you'd like, you can always wait a bit and re-do it with the darker shade.

Besides, new hair colour means I simply must go makeup shopping to tweak my colour palette, right?

Oh, PS: I am wearing a luscious Tarte mascara and bronzer today, which I am testing out so that I can review them for Meg's Makeup! Stay tuned for more details!


* Read: perpetually confused


[EDIT: Oh, for those of you who hate your new semi-permanent colour and want to get it out, please go see the Left Brain's enormously helpful tip in the comments here Who knew a good ol' head soak was the answer?]

Labels: ,

Wednesday, April 16, 2008

Ask the Body Shop!

Hey y'all! Some of you may know that I used to work at The Body Shop back in the day. I loved the job... learned a lot, and made some lifelong friends. It was a blast! One thing I remember especially was watching the training videos for the then-newly released makeup line. I loved The Body Shop's head makeup artist, Chase Aston, both for his helpful tips ("bend the mascar wand when applying to another person's lashes") and for his lurrrvely accent. So when I got the opportunity to ask Chase some of my most burning beauty questions, I jumped at the chance. Here are my questions, and his answers, for your viewing pleasure!


Glitterati: Wedding season is upon us, and with it brings a whole lot of photo ops. Do you have any tips on how to look your best in photographs? (For brides and guests!)

Chase: Here's the secret to looking amazing in your wedding photos: add some special touches that you would not normally wear everyday. Visit your nearest The Body Shop store wearing your normal everyday make-up, and speak to a consultant about trying a new look for a special occasion. Ask her to demonstrate The Body Shop Spring Bloom collection on you and/or any other products to create a look for that special day.


Glitterati: Over the past few seasons, we've seen a lot of striking looks on the runways: from the return of lipstick, to all-over-neutrals, to bold 'n bright eyeliner. What beauty trends have inspired you the most? What trends or looks do you forecast being influential in the upcoming seasons?

Chase: When working on creating color trend collections, I work closely with The Body Shop product development team. The inspiration comes from art, color trends, fashion and the environment. The team liases with trend forecasters, then we discuss new formulations, textures and innovative trends and products. Once we have assimilated all this information, myself and the team then start laying down shades and formulations, that are trend led, innovative and also suit most our global customers. The Body Shop sells in over 52 countries, so it is a very tall order, but very exciting, always.

A trend that I believe will be influential in the upcoming seasons are a near-nude mouth. It catches light for an instant plumping effect and appears ethereal when part of a dewy, monochromatic face. It can be paired with creamy neutrals on eyes and liquid foundation on skin.


My fave Body Shop products for achieving these looks? For a flawless photo-ready complexion, consider applying your liquid foundation with a foundation brush. Yes, it takes more time, but you get a smooth, perfect finish, and you actually end up using less foundation. It's also very easy to stipple on extra product on problem areas, so you get coverage without masky-ness. The Body Shop's foundation brush is nicely weighted, with soft-yet-firm bristles, and at only $20.50, it costs less than other brushes of similar quality.


Since weddings are all about chatting and laughing and drinking and eating, I find that a lip stain lets me do all that without worrying about how my lips look. The Body Shop makes a lightweight gel version in a slightly-cool red. It goes on sheerly for a boost of healthy-looking colour, perfect for Spring. Double-duties as a cheek stain too!


As for the perfect nude mouth... I truly don't believe that there is one nude lipstick that is flattering for all. You simply have to get out there and try on a bunch of colours to see what works best for you. But to acheive an innocent, ethereal look, I cannot wait to try on the new Blushing Daisies Powder. Aside from the adorable compact, the shimmering shades (in Light Pink, for my skintone) look like it would be perfect for creating a multi-faceted, angelic glow. The Marula oil in the formulation keeps it silky soft and non-drying, and the different shades in the compact can be used in varying intensities all over the face for that chic monochromatic look that Chase describes (check out the link above for tips).


Many thanks to the Beauty Blog Network and Chase Aston for making this Q&A possible! Be sure to check back in the next couple of days to see what other beauty bloggers had to ask Chase!


Photos courtesy of The Body Shop and Metropolis Japan


Labels: , , , , ,

Wednesday, November 21, 2007

The THINGS THAT SUCK!!!! post

Internets! I am feeling all sorts of spiteful and frustrated and vengeful as of late. Not cool! So instead of binge-drinking and making other dubious life choices, I have decided to try this sublimation thing and use this opportunity to rag on things I hate. Read on! Rant with me! (Or at me!) Scream into your pillow! It does a body good.


Maybelline Great Lash. WHY do people still use this? WHY? It's sloppy and wet and smears and feels heavy and doesn't even do much. WHY????


Patchouli. So many a scent has been ruined by the heavy patch. Like the new YSL Elle, with Coco Rocha looking so amazing in the ads. Wanted to love it, but can't! Same thing with all of the Pleasures perfumes, sooo nice on everyone else, but on me? Stinging dirty head-achy patchouli is all I smell after 15 mins. Arrgh!


Razors. You are telling me that in this day and age, when they can put monkeys on Mars and real boobies on burly men... you are telling me you can't make a frickin' razor blade that stays sharp for more than 2 weeks? This is a marketing scam to get us to buy more ridiculously priced refills, and there is nothing I can do about it unless I want to go all hippy and unshaven (um, no). Gah!


Scarlett Johansson. I know, you all love her. WELL I DON'T. Aside from her fame, she is a slightly mannish girl at whom I wouldn't look twice on the street, except maybe at her admittedly nice rack. Slapping on some bleach and red lipstick doesn't make you "Old Hollywood" -- news flash, those women were actually handsome. And didn't have moustaches. ScoJo's gotta go! My lovely Josh Hartnett has figured it out, Rihanna is much much hotter (even if the age difference is a bit creepy).


Silicon-based "mousse" foundations. What the hell is the point of giving me airbrushed-looking skin, just to break me out after 2 days? Why taunt me???


So-called "perfect for all skintones" lip liners. Mac Spice, Body Shop Beech, Rimmel Clover... I'm looking at all of you. You all turn completely muddy and/or orange on me, while everyone else clamours on about your perfection. Go on and make my lips feel like freak rejects, will you!


Jockey's strapless push-up bra. This devil left red welts on my skin after I accidentally wore it to bed. I'm not kidding, it scarred and took weeks to heal. I'd hate to imagine what their jock-straps do...


Overly smokey eyes on Asian girls. Okay, this is an odd one. But I really abhor when Asian (well, Oriental) girls try to do the full-on smokey eyes, with the black eyeliner all the way around the bottom and top lash lines. Ladies, most of us don't have much surface area to work with, and blending all that colour up to your eyebrows is a bad idea. Restraint is the key. Plus the super-duper eyeliner just makes you look trend-whorey and ... well, mean. Like how I am being right now. Har. Check it out:


Just... NO! I feel kind of bad posting these... some of them are real women, who I'm sure are just awesome people. But the eyes! Are dirty and smutty, and not in a good way. I even asked for an impartial guy's opinion about the girl on the top right (she's a model, so I didn't feel quite so bad), and while he neither agreed with "hot" nor "brothel girl from those Suzy Wong days", his diagnosis was "It looks like she has a black eye on the right". Attractive.

It's not entirely their fault... I've read dozens of articles, blogs, and books telling Asian women that we should use lots of dark smokey jewel tones and black eyeliner to enhance their "exotic shaped eyes". But have any of these advice-givers actually looked at girls in Asia? Those who actually do it right?


Okay, granted, these girls are movie stars or models or various other celebs. And maybe they didn't do their own makeup. But they look HOT. Their eyes are dramatic and sultry, but still clean.

So what's the difference? Keep the dark colours very close to the lashes! In the HOT photos, the darkness ends at the eyelid fold. Just like how you wouldn't blend past the crease and up the bottom of the browbone for Caucasian eyes, bringing dark colours past the fold is asking for trouble, unless you have a really large or round eye area.

That doesn't mean you can't use colour higher than the fold... just keep it light and sheer. You can go a bit bolder if the bottom lids are minimal, without heavy liner all the way around. However, if you're going to be doing a thicker or smudgier line on the bottom lashes, consider keeping the area above the fold as clean and naked-looking as possible. For an awesome guide on how to do an attractive smokey eye, check out this post from Makeup For Life, from whom I stole 2 of the above (hot) pics.

Of course, I have seen Asian girls look amazing in a whoppingly dark and gorgeous smokey eye. And yes, I'm very jealous. But generally, they are model-like (if not actual models), or performers of some sort for whom these larger-than-life looks are appropriate. For real life, please, please, don't cover up your natural gorgeousness with trashy eye makeup. Please!


Anyway. Finally... Gossip Girl Re-Runs. Fuckin' hell. Can't a girl get a break already?


Whew! That was quite the bitch-fest. I feel much better now. How about you? Agree? Incensed? Let it all out!


Labels: ,

Thursday, July 26, 2007

Product Review: Juice Beauty Green Apple Antioxidant Moisturizer

This review was brought to you by Meg's Makeup. To see what others thought of this moisturizer, check out the reviews here!


Dudes. I had to spend last night at The Boy's place unexpectedly (okay, "chose to spend...", whatever) , and thus had none of my gear with me. I mean, I had soap and shampoo and all that basic stuff over there, but no beauty stuff... no cleanser, no moisturizer... nothing. All the makeup I had was whatever was in my purse, so my deepest and most sincere apologies to whoever saw me at work this morning and gagged a little at my appearance*.

Being away from my moisturizers sucked, and I don't even have super-dry skin. But this experience of missing a moisturizer reminded me of a product I'd received from the razor-sharp wits over at Meg's Makeup a bajillion moons ago. I never posted about it here! Egads. Well here it is: Juice Beauty Green Apple Antioxidant Moisturizer. And lemme tell ya: I LOVED it!


This cream... so gel-like and cushy and quenching. So refreshing and calming. So delightful in its soft vanilla-lemon-apple scent. So lustworthy. So $45 USD for 2 oz (!). So little left in my jar. So sad.

I used this throughout the late winter/spring, and I don't know if it was the moisturizer that did it, or just all those holidays that involved copious consumption of chocolate and alcohol. But my skin looked brighter and more even, and felt silkily plump. And I smelled like a princess who could afford to use kinda-bling** face cream at bedtime, so that's always a bonus.

I have been hoarding away the last little bit in the jar for a few months now. My old standby (L'Oreal HappyDerm) is still as good as ever, but I miss that Green Apple Moisturizer! I've heard that Juce Organics makes a drug-store version of it that is much more affordable, but I keep forgetting to pick it up whenever I'm in the States. And no matter how awesome Juice Beauty's moisturizer is, unless it also happens to pay my rent and buy me groceries, I'll have to stick to its humbler (but hopefully adequate!) cousins for now.

What's the scoop, blog friends? Have you tried Juice Beauty's Green Apple moisturizer? Or Juice Organic's version? What do you think?


* It actually wasn't that bad, if I may say so myself. On a good-skin day, some judiciously applied concealer, and a brozny-rose lipstic (Estee Lauder's Sugar Honey") on the cheeks and lips can do wonders.

** Not really bling though. It ain't balla like this stuff.


Labels: , , , ,

Tuesday, June 05, 2007

Product Review: Orange Palms Preventor

Things that suck:
- Cancer (I mean, duh, right?)
- The Sens game last night (Started out so strong! All for naught!)
- Streaky, stinky, orange palms after you self-tan


Fortunately, there's something we can do about 2 of those things*. Not that we can reduce the incredible suckiness** that is cancer, but we CAN help support the research and development of cancer treatment, prevention, and care. We at the Beauty Blog Network are making it easy to help. All you have to do is leave a comment on this and other participating blogs (see list below), today and tomorrow! For every comment made on this blog over the next 2 days, I will donate $1 to the Canadian Cancer Society, up to $50. (I'm only at 8 comments so far, let's kick it up a notch!) Plus, commenters get a chance to win a free t-shirt. It doesn't cost you anything other than a couple of seconds, and the comment doesn't have to be anything profoud... just say that you're "Commenting for a Cure" or something. Or share your own stories about how cancer has touched your lives. Or tell a joke. Or share a recipe. Whatever. Just comment! It's fun, I promise!


Okay, so what about those orange palms? Savvy ladies know that sun tanning is a big no-no (cf: cancer sucking), but sometimes you just want a little glow to go with that sassy little sundress. The marvels of modern self-tanning technology have made it a snap to achieve golden skin without the risks of sun damage. In fact, there are so many self-tanners on the market that Kristen over at Beauty Addict is doing a series of very helpful reviews on a whole bunch of tanners. But while good formulas can give you streak-free, natural looking colours, virtually all of them require you to rub it in with your hot lil' hands. Which often means that you end up with palms that are stained orange and reek of the telltale DHA smell.

Soap and water will help, but not much. Even if they get the colour off, I can always still smell the DHA stank, which is especially gross on your hands since it comes into close contact with your nose and mouth so often. Plus, it interferes with perfume if I spritz it on my wrist. This is where this nifty little product comes in to save the day:


Orange Palms Preventor. Not the most original name to be sure, but at least it's obvious what it does. After you apply your tanner, all you need to do is wash your hands with a squirt of this creamy white scrub. It exfoliates away the residual tanner, and the plush formula keeps hands from drying out. Plus it's got this nice vanilla-orange smell to it -- the smell doesn't linger, but somehow, it eliminates the DHA smell from my hands. If you're like me and you just tan your legs (my arms tend to have more colour than my legs... I know, incidental exposure, bad!), you can scrub-up Grey's Anatomy style and use the Preventor all the way up your forearms. (I find I'm always inadvertently resting my arm agains where I've just put tanner). If you self tan your arms, you'll have to be more careful about splashing.

Just 1 squirt of the product will suffice for each use, and the bottle has lasted me through all of last summer and this spring so far (although I only self-tan sporadically). I got mine at Shopper's Drug Mart, but I haven't seen it on store shelves recently. You could try asking their cosmetics manager to order it in for you. You can also try purchasing Orange Palm Preventor from their website, or from this site.

I truly consider this item a summer essential. Check it out and see how you like it... anything to make self-tanning a more pleasant process is good in my books!


Thanks for visiting & commenting today, and please check out the Comments for a Cure website, CaféPress Store, and leave comments for the other participating blogs too!

99 Products
A Touch of Blusher
A Girl's Gotta Spa
Aging Fabulous
All About the Pretty
All Lacquered Up
AZ Spa Girls
Beautiful Makeup Search
Beauty & Fashion Tech
Beauty Hatchery
Beautynomics
eBeautyDaily
GirlPaint
Life of a Ladybug
Lipstick Powder n' Paint
Makeup Minute
Mystical Beauty Musings
Pretty by Nature
Real Self
The Beauty Newsletter Blog
The Makeup Bag
The Makeup Girl
The Product Girl
The Perfume Bee
We Love Beauty
Yummy411


* The Ottawa Senators are, I'm afraid, on their own.
** I sound flippant for such a serious topic, I know. But when it comes down to it, the disease just sucks, plain and simple.


Labels: , ,

Wednesday, May 16, 2007

Sleepover!

Wheeee! Tonight is the season finale of ANTM, and my pals and I are having a good ol' fashioned sleepover in honour of the event. I am trucking my crapload of makeup over there, and shall attempt to co-erce my friends into letting me doll them up.

In other news, I apparently have 2/3 of a small suitcase of makeup that I deem presentable enough to be used on friends. And that's not counting any hair and body stuff. Yikes.


Oh, and here's a random tip -- unless you've fallen absolutely crazy in love with a nail-polish colour, why shell out the big bucks for the high-end stuff? Drugstore lines have loads of variety in colour, and you can often create exactly the shade you want by layering 2 polishes. As for staying power, just buy a high-end topcoat (I like OPI) to go over your cheapie colour. It totally works -- my Sally Hansen "Hard As Nails" + Rimmel pedicure lasted for weeks this way!


Alright, off to the party. Go Renée! And please stop calling yourself Néné!


Labels: , ,

Thursday, May 10, 2007

Product Review: New York Color Pencil & Pout

Cheap and Cheerful.

Apparently this is a good thing when uttered across the pond, and not a name for a value-priced escort service or something. And since I'm ready and willing to embrace all things English, from their accents to their bands to their... er, accents, I'll be all over this like ... like how Paris Hilton will pay complete attention to everything. (Okay, I know that doesn't actually make any sense, but I just wanted to use that quote. Because... seriously, Paris?)

So, if you've been reading along, you'll notice that I have this intermittent obsession with the red lippies. Can you blame me? All the models look so damn gorgeous with their ruby-red lips (and the heartbreaking bonestructure and impossibly good hair and genetically unlikely eyes and whatnot) that I just wanted to hang with the cool kids. But, sometimes, you just want a lipcolour that WORKS. Something strong and polished-looking, but that you don't need to plan a whole outfit or attitude around.


For me lately, this go-to lip colour seems to be NYC's Pencil and Pout, in Parfait Duet. This product has a creamy pencil and a smooth pigmented gloss all in one neat medium-sized package. Line and fill with the pencil, then top with gloss, and voila, you've got a glossy lip look with amped up staying power. This will come off on your coffee cup, no doubt, but you'll still find enough pigment on your lips afterwards to leave a pretty stain. And, unlike most longer-lasting glosses, this stuff isn't sticky, so you'll avoid the fly-trap hair phenomenon.

Parfait Duet is a plush, rich, cool rose. The gloss alone is pretty, but layer it over the pencil for the wow-factor. (The pencil is darker than the gloss, but somehow, the combo is bang-on). It ends up being a polite, ladylike colour -- perfect for work or mid-afternoon shopping. (Because in my warped little mind, snooty sales girls are nicer to me when I've got a good lipstick on.) This isn't exactly the sheery summery gloss look that is all the rage during warmer months. But it is poised and constant, like a good twinset and a double-strand of pearls. Oh, except for around $4 a pop, it'll cost you much less!

Alright folks, back to the paper writing. The end is near! Maybe!


PS: I should note that I was not equally impressed with all the colours in this line. The Teaberry Duet is a nice medium plummy neutral, and the Tawny is more coppery colour. But I was really disappointed with the lighter pink and peach combos -- the pencil looked orange or muddy, and the glosses lacked pigment, with an annoyingly chunky glitter. I don't know, maybe it just didn't work with my skintone, but there's the FYI for ya.


Labels: ,

Wednesday, April 11, 2007

Product Review: Gloves in a Bottle Shielding Lotion & Steps for a Speedy Pedicure

For some odd reason, the more work I have on my plate, the more I want to avoid it*. Some people manifest this avoidance behaviour through sports ("3 term papers and an exam in 2 weeks? Hey, let's join a spin class!"). Others look towards the TV (Arrested Development marathons, anyone?). Still others manically clean and organize everything in sight (these people should come over to my place).

And for me? My attention turns to beauty and beauty-related activities, of course.

Exams to mark? Pedicure!

Presentation to give? Time for a new gloss/eyeshadow/blush!

Paper due? New highlights!

Thesis defense? Major reconstructive surgery! And then flee to Finland and drown sorrows in pickled herring and Aquavit!


Fortunately for me, I've a few years to go before the Thesis defense happens. But, I do have all that other stuff going on, which means that it's Pedicure time, at the very least.

I don't know about you, but I am lazy. I'm certainly not one of those people who exfoliate their soles and keep toes all pretty and polished during the winter months. But inevitably, the call of warm sunshine and cool breezes** gets too much, and the strappy sandals must come out.

Of course, one is rarely prepared for this opportunity. Instead, one finds oneself with nary an hour to go before the sandal-worthy event must happen. In short, one needs a Pedicure In A Hurry.


The choice of the right polish is fodder for another post -- or another blog, for that matter. Today I want to talk about how you can turn those rough, scaley hooves into smooth sandal ready feet, all in about 10 minutes***.

- First, you need a foot file. I really like Dr. Scholl's Contoured foot file, but your favourite file or pumice will do just fine.

- Next, hop in a nice steamy shower. Mmmm. Wash your hair, shave your legs, do your shower 'thang. This would be a great time to use a deep conditioner, since you'll be spending a few extra minutes in there.

- Grab your most moisturizing body wash. I've been using Olay's Creme Ribbons Body Wash which is alright as a wash, but especially good for pedicure purposes. Slather some on the sole of your foot.

- Take the foot file and rub it over any rough spots (ball of foot, sides, heels, tips of toes, etc). The Dr. Scholl's one is great because it's contoured, and small enough so that I can target a specific area without rubbing the rest of the foot raw. The creamy lather from the body wash helps soften skin and protect it from too much abrasion.

- Do this until you are satisfied with the results, or start to get bored and/or pruney. This usually takes me just a couple of minutes. Lather, rinse, and repeat for your other foot.

- Rinse yourself all squeaky clean, and hop out of the shower. Now it's time to get your moisture on.

- This. This is the most important part, and is where the review for today actually starts. Up 'till now, any of your favourite pedicure/bath products would have sufficed, but the next step crucially depends on a shielding lotion like Gloves in a Bottle:


Okay, so it's not the most glamourous looking bottle. But it's exactly what you need. This thin lotion sinks into your just-scrubbed feet, and soothes and smoothes like nothing else. I've tried doing this with body butters, other lotions, and creams, but they just won't work as well. With the other products, your skin gets soft right away, but the feeling fades after an hour, and then you're left with dry flaky skin again. Gloves in a Bottle gives you silky smooth skin that lasts throughout the day. Plus, this sinks in so fast and so thouroughly, while other lotions leave me skidding across our tile floors, picking up random debris along the way (ew).

Now, we're talking about a quick-fix pedicure here, so obviously, results won't be as good as a proper maintence routine (i.e., where you exfoliate and moisturize daily). BUT, if you use Gloves in a Bottle in place of your regular foot cream, you may just find that you need to be much less diligent with that routine, since it locks in moisture so well.

Of course, this lotion works for the skin on the rest of your body as well. You may remember the good results I got with Skin MD Natural, another shielding lotion, and this is certainly a comparable product. There's not much difference between them -- both are soothing, non-irritating, and both absorb quickly. However, I find that while Skin MD has a very light almondy scent, Gloves in a Bottle is truly scentless. There is a fleeting, odd smell of school glue (not really unpleasant, but weird), and then nothing. Due to this, and a slightly better skin-feel during application, I prefer Skin MD. But, if you don't feel like shelling out $25 for 4 oz., take heart: Gloves in a Bottle does pretty much exactly the same thing, and it's only $12.95 for 8 oz. Plus, you can physically go purchase Gloves in a Bottle in Canada AND the US, and the website has a handy retailer locator.

And, if you REALLY love Gloves in a Bottle, you can even order bottles by the gallon! Which sounds crazy, but really isn't if you're using it in a hospital or factory setting, or if your entire family gets hooked on it or something.

Finally, Gloves in a Bottle has this picture on their website. Which makes me think of things like.... um... Farah Fawcett, soaring gloriously. On a dove. Spreading messages of hope and peace and love. And of soft feet!


* Okay, fine, this is not odd. It is the way of the graduate student. Possibly even the way of Life -- the founding rule for all of creation.

** Unless you live in Toronto, apparently. Oh warm weather, why won't you come?

*** OMG, I totally felt like an Infomercial Person right there. "How much would you pay for this amazing talking amazing new cleaning system? $200? $500? $1000 and the left arm of your first-born? Well today, you can have all this for just 3 easy payments of $19.99!" I have career OPTIONS, I tell you!


Labels: , , , , ,

Friday, December 22, 2006

Home for the Holidays!

Hello world! I am posting from ol' Cowtown! Yay!

So yes, I am back home for the holidays. We're having a bit of a to-do this year, such that my house has 11 people in it, 4 of whom are tweens. Should make for a fun Christmas! Sadly, this means that I won't have much time for blogging over the next few days. But I will leave you with some holiday beauty tips, courtesy of my own warped little head. (They won't make you look warped, they just came from a warped source, follow?)


One of my favourite make-up tools for creating a happenin' party look is the flat slanted eyeliner brush. (Mine is from Quo Cosmetics, but you can also find quality ones at Sephora, MAC, etc.) Dampened with a bit of water, it can turn any richly coloured eyeshadow into a dramatic eyeliner. Just press slanted bristle tips into a pigmented, jewel-toned shadow, then draw a line as close to the lashes as possible. You can make the line thick or thin depending on your look. To add more dimension to the colour, load the flat side of the brush (dry this time) with a sheer shimmery shadow in a coordinating shade, and tap lightly over the darker shade. Voila! Striking lids with a festive sparkle! I find this method especially great for enhancing Asian or almond-shaped eyes.


Want a plump, sexy pout? Dab a tiny bit of shimmer powder in a flattering shade (e.g., yellow golds for warm tones, beige gold or light pink for cool tones) on the dip of your cupid's bow, right where the lip meets skin. Repeat for the bottom lip, placing the shimmer at the fullest part of the lip line. Subtlety is key... use your pinky finger to apply to keep it softly blurred and slightly imperfect. Finally, top it all off with a bit of shimmery gloss on the fleshy centre of the bottom lip. The light will catch these parts of the lips and make them look fuller. Easy-peasy. Now go stand under that mistletoe and pucker up!


This last tip is kind of gross... but I think it's a good one. Besides, the art of beauty is not without its dark side.

Anyway, has this ever happened to you? During one of those fancy holiday shindigs, you hit the Ladies' to touch up your powder, only to realize that you have the remanents of a mini spinach quiche hopelessly wedged between your front teeth. Such a glamourous look, I know. But fret not -- the answer to your dental woes is probably already in your makeup bag. Just take one of those Clean & Clear style oil blotting sheets and use it as floss! The rubbery plastic texture means that it won't disintegrate when it gets wet, and you can stretch out the edge thin enough so that it'll slip in between your teeth. Like I said... kinda gross, but eminently helpful not only for the holidays, but also during dinner meetings, dates, conferences, etc. Because seriously, who has the foresight to carry around floss in her clutch???


Okay, that's all out of me for now. Before I go though, I'd like to point your attention to Elke's very touching post about why this beauty business isn't all just fluff and whimsy. [EDIT: Link is now fixed, sorry 'bout that] Somehow, it really helped put me in the Christmas spirit. (Admittedly, the eggnog + Kahlua I had last night also helped.) And since I negelcted to share these last week, I bring to you here the roundup of the best in beauty blogging!


Elke shares the newest way to update your look with the new smoky eye in her latest podcast. Perfect look for your next holiday party!

Lipstick, Powder 'n Paint say "Don't forget the boys this holiday!"

Mystical Beauty's Mini Review of Darshan Beauty

Hello Dollface checks out a hot new line, Napoleon Perdis


Happy Holidays everyone! I hope you all have a safe, warm, and wonderful holiday season, filled with friends, family, and good food. Enjoy the festivities, see you soon!

Labels:

Monday, November 27, 2006

Product Review: Tarte The Eraser Concealer + Happy News!

Coming home after a big exciting trip is always a bit... bleagh. You've gotta unpack, do laundry, respond to the gadzillion emails that have accumulated in your inbox... it's decidedly un-fun. But fortunately, I had something to look forward to...
I've been invited to join The Beauty Blog Network! A directory put together by none other than the fantastic Elke VonFreudenberg, it's comprised of some of the best beauty blogs out there. And... uh... me.

Anyway, I'm super thrilled to join the network. Plus, there's a handy weekly summary of what people around the blogosphere have been talking about. Bringing the best of beauty to your doorstep! (Screen-step?) Do check it out!


Now, on with the review. Remember how I was all wanting to try Tarte's The Eraser Concealer? Well, I finally did!


I really really wanted to like this, but it just wasn't going to happen. Don't get me wrong, the coverage was great. While not as opaque as it could be, it looked very natural and skin-like. It applied seamlessly, like a thin, smooth, flexible layer of second skin. That's the silicone at work for ya, I guess. It was just creamy enough to feel smooth and substantial, without being hard to blend.

The applicator is a bit finicky -- it's like those lip glosses with the brush on the end, where you have to twist the bottom to advance the product. If you've used those, you know they're kind of a pain. But it does save on you toting a separate brush around if you're travelling.

The biggest thing though, was the shade selection. I bought the "Light" shade, thinking that it'd be perfect for my light-to-medium warm skintone. Sadly, it was just a titch too dark for using on undereye circles, and isn't that the whole point? It *was* great for concealing blemishes and redness, but so are lots of other, cheaper concealers. I tried the "Fair" shade as well, but that was too light. Sigh. Back to Sephora it went.

So until Tarte comes out with a "Fairly Light" shade or something, I'm out of luck. But if you think you can find a shade match, I'd definitely recommend giving this a shot. Just be sure the store allows refunds... I'd have been mighty pissed had I been out $27 CAD!

Labels: , ,

Wednesday, June 28, 2006

Product Review: L'Oreal Sublime Bronze

Hello friends! It's been so long.... I've been battling car issues (DON'T get me started) and going to cottages and laying about on beaches and going to jazz shows! Not a whole lot of blogging got done in between all that, I'm afraid.

Let me take a quick moment to thank the lovely Emilie Claire Barlow for putting on an amazing show on Saturday. It's like she picked my brain and found my current favourite songs of hers and performed them all! EC is a jazz singer, quite possibly the best jazz singer in all of history. She's pretty much my favourite musician for ever and ever amen. She's local too, so I get to catch her gigs often, and I think that Saturday night's was the best I've seen yet. It was a warm night, the bar was packed, and the jazz was smokin'! I'd like to especially thank EC for finally hiring a young, goodlooking (and talented!) drummer. Not that I'm into that any more, of course. But it's nice to have nice things to look at, no?

Also! I saw Etta James in concert last night, and she is incredible! That voice hasn't lost any power over the years, and she remains a sassy and engaging entertainer. Plus, Etta looked damn good! She is the hippest, sexiest 70-yr old mamma ever and I envy her grandkids. I actually shed a couple tears (shh! don't tell!) when she sang "At Last". (Bonus: my mascara -- LashExact -- didn't run!)

Anyway, back to the review. Speaking of laying about on beaches, with beach season comes the fear of exposing one's legs and having them mistaken for flourescent light tubes. Fortunately, we now have all manner of self-tanning products to give our skin a healthy-looking glow. I've tried a few of those lotions where there's just a tiny bit of self tanner inside, and they're quite good at what they do (I think Cowgirl Warrior will be doing a review of a bunch of them soon!), but I was starting to miss the faster and more pronounced effects of a proper self tanner.

I've tried a few self tanners in the past... Sally Hansen (ewwww!), the Neutrogena foam (streaky AND stinky!), and the Body Shop's Fake It (alright, but not the best smelling, and pricey for what it is). On the recommendation of the most excellent Mrs. Badger, I picked up a tube of L'Oreal Sublime Bronze. She was careful to add that I wanted the tinted lotion version, not the gel, and not the one with SPF. And so that's what I got.


In a nutshell, this is the BEST self tanner I have tried. (I know this is old news to lots of people, but it's new for ME, so there ya go.) It goes on smoothly, and it's tinted this shimmery bronze colour, so it's clear where you applied it. Also, it means that you get a nice (if temporary) glow right away, if you're in a hurry. It gives great, even colour, and doesn't grab overly on dry skin (To try avoid dark spots, I use a good moisturizer just on my knees and ankles first, and then dab those areas again with a damp tissue after application). I grabbed the Medium-Deep version the first time as it was all the drugstore had, and to my surprise, I found that one application made me quite tan, but not too dark. After a day or two of regular exfoliation and shaving in the shower, it faded to a nice medium tan. I've since tried the Light-Medium, and it's pretty much the same performance-wise, just lighter in shade (duh).

The best part about this tanner is that the DHA-reek is NOT that evident! If I put it on before bed time, by next morning, it's quite subdued. I would say it's on-par with (or even a bit less stinky than) the Jergens Natural Glow lotion. If I put it on in the morning, I do find that it gets a bit smelly during the day, but it's no where NEAR the god-awful stank of the Sally Hansen stuff. I do find that it takes some time to dry ... it feels a bit sticky for the good part of an hour, so if you can arrange to be pants-free for a while after you put it on, all the better. For such an even, natural colour, I'm willing to put up with the slight smell and stickiness. Time to show off those gams!!

Labels: ,

Wednesday, June 14, 2006

Product Review: Cover Girl LashExact Mascara

So, between all the ANTM and the Queen Latifa and Cowgirl Warrior's recommendation and all the hype on MUA, it was inevitable that I would purchase this mascara. Even though I have FAR too many mascaras for a girl who doesn't even use them all that often.*

Lash Exact's main selling points seem to be the brush, Jade, THE BRUSH, and its clump-free application. I picked up a tube in Blue, simply because I could. The purple tube is on the giant side, but it sure is purrty.


Let's get to talking about THE BRUSH then, shall we? This thing is plastic and spikey-looking, and is supposed to be key in providing separation and definition like you've never seen before. I liked that it pulls out of the tube cleanly -- there's no globules of excess mascara at the end of the wand to deal with. However, this shit hurts if you accidentally get too close to the lashline. With a traditional mascara wand with softer bristles, this usually leads to a big ol' smear, but it's not too painful. With the Lash Exact brush, there's much less smearing (yay!) but rather more pain (nay!). The answer to this problem is to not be a jittery klutz like me. Put DOWN the coffee before putting on the mascara, G! When will you learn???

As for the no clumping promise? There's certainly no clumps of the "chunk-of-mascara-on-a-lash" variety. But, while the mascara goes on my right eye splendidly, I somehow always seem to muck up the left eye (I am right handed) and get the lashes all stuck together. I've had to run a lash comb through them to separate them a few times. Since it defines my RIGHT lashes beautifully, I am inclined to think that this may be a problem with moi and not with the mascara. That being said, I am definitely not a mascara novice, so I'm not really sure what Exactly (har) is happening.

I have found that the best way for me to apply Lash Exact is to first curl the lash, then tilt my head back and look down my nose at the mirror and apply the product with a very light, feathery stroke. With the right eye, I have to twist my hand around so that the brush points towards my nose, not my ear -- this seems to solve my clumping problem. For either eye, any more than 4 strokes leads to clump city, but fortunately, you really don't need more than 2 or 3 strokes to coat the lashes thoroughly.

If you can get past all that, LashExact really is a very good mascara. It lenghthens and defines as promised -- it gives a natural, pretty, "casual lash look". Lashes feel soft, not brittle, and they hold a curl well. Most of all, I am amazed at its staying power! It does not smear. EVER. Not even on that spot under my left eye on which all mascaras smear. Not even after a long nap. Not even after an all-nighter. I haven't cried with this on or anything, but so far, it's impressed me very much me with its longevity. It's not even technically a waterproof mascara!

The Cover Girl website says that this is a good mascara to apply to your bottom lashes, a thing which I had never considered before. Because: a) my bottom lashes are so damn sparse I'd be lucky to find them with my mascara wand, and b) hello, if I can't keep mascara from smearing off my top lashes, how the hell am I supposed to make them stay put on the bottom ones??? While there's not too much to be done about the first point, Lash Exact's amazing stay-put-ability makes me willing to actually *try* mascara-ing my bottom lashes. And also willing to make up new words, apparently.

So, while LashExact takes a little extra time and care to apply properly, I'm willing to reach for this on those days when I just want to be sure that my mascara won't budge. As many others have said, it doesn't do a whole lot in the volume department, but it adds a nice amount of length and definition. (FYI, you can build with multiple coats, but there will be much brushing out of clumps required, and it still doesn't look as good as a proper volumizing mascara.) Oh yeah, it also smells kinda weird, but I'm not much for sniffing my own lashes, so whatevs.

For me though, the most rewarding part of owning this mascara is hearing Danielle say in my head every morning, in her southern accent: "The cluhmp stops herrrre!"


* Actually, I wear mascara ever single day now, for no reason other than the fact that I have all these freakin' tubes of the stuff lying around. This is most likely how people get addicted to crack and gambling.

Labels:

Monday, June 05, 2006

Product Review: Tarte Cosmetics Park Avenue Princess Bronzer

It's tough for me to talk about bronzers. I'm just not a bronzing kind of gal -- I much prefer blushes. At most, I'll fling on some shimmery peach blush and call it a day. This is not to say I'm not interested in bronzers, I just don't think we get along all that well. But, as this is another review for Meg, I will valiantly go forth and bronze away.

As always, a condensed version of the review (as well as other testers' worthy opinions) can be found on Meg's Makeup. (Sorry for the incessant linking. It's a compulsion. Blame the universities of Canada for hammering in early the laws of citations in writing.)


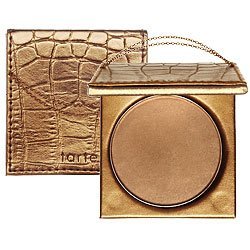
Let's go right ahead and judge a book by its cover, shall we? In this case, we are judging a bronzer by its... er... case. Continuing the tongue-in-cheek fabulosity that seems to be Tarte's theme in packaging, Park Avenue Princess screams bling. With a bronze mock croc covering and a little gold chain (yes seriously) across the front, this compact looks kind of like a little purse.

Open the magnetic snap case and you'll find a pan of shimmery bronzer and a good-sized square mirror. The powder goes on very smoothly, and is quite pigmented. No worries about it not showing up -- even for the darkest of skintones, I think this would give an attractive shimmer. The first day I tried this, I used a rather heavy hand. All of a sudden, I felt like I should have some skimpy sequined top on. Like I should drink some Tab + vodka or something. Very much a Miami Club vibe...

Not exactly the look I was going for that day though. My second try was slightly more successful. But something still wasn't right... I looked more glow-y, that's for sure. But I missed the brightening effect that a good blush will give.

They say that 3rd time's the charm! Today, I swept on the bronzer with my usual blush brush (instead of the fluffier, larger one that I had recently purchased). The stiffer bristles on my blush brush gave me more control over where I placed the product. Plus, I think the residual blush particles on the bristles (I had been very amiss in brush cleaning!) both added extra colour and prevented too much bronzing powder from being picked up. The effect I got was a sheer dusting of sunny looking colour on my cheeks. The bronzer added a subtle, healthy gleam that I don't get when using blush alone. When applied this way, the shimmer is very slight -- no one was going to mistake me for an errant and confused club kid. That being said, if you ARE looking for that kind of look, this bronzer is unbeatable.

I liked that this bronzer was not too dark, and that it did not look muddy. The shimmer packs quite a punch, but you can avoid the blinding J.Lo look if you tap off the excess before applying. This yellow-based bronzer should flatter most skin tones... I imagine it would look especially good on blondes (because it won't overpower pale skin) or ladies of Mediterreanean or Latin descent. It would also be stunning on collarbones and shoulders for a night out (use a big fluffy powder brush). For me, the way to go is to swirl the brush in pink blush first, then pick up some bronzer, tap off all of the excess, and apply. Add a bit of pale gold eyeshadow, slick on some light mauvy-pink lip gloss, and I'm ready to take Park Ave by storm! (Or at least Mississauga Rd., as is the case today...) Now if I can only dig up some hot stockbroker around here with whom to share a 3-martini lunch...

Labels: , ,

Friday, June 02, 2006

ohmigodohmigod

My hair. Is all black. All entirely freakin' black. Halloween witch wig? That's me. I had just wanted to take out my highlights. But this... THIS! I haven't had hair this dark since the womb. I am Morticia freakin' Adams. Ohmigod.

Plus I look really bad in hats. Stupid stupid porous hair. More details tomorrow, for now I am going to sleep on my inky black hair and hope it somehow looks better by the light of day.

Labels: ,